Wednesday, October 30, 2013

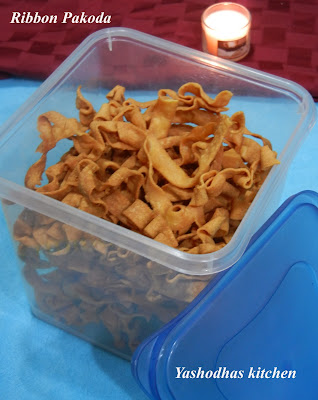
RIBBON PAKODA / OLA PAKODA / NADA THENKUZHAL - DIWALI SNACK

Preparation time - less than 10 minutes


Cooking time - 30 minutes


Serving size - 8 to 10 persons


Ribbon Pakoda is a very famous Indian spicy snack. It is also known as ola pakoda and Nada thenkuzhal. This is one of the most important snacks on Diwali and krishna jayanthi. My mom won't do this on the day of krishna jayanthi but my MIL always makes this on Krishna Jayanthi. I often make this snack(my husband's favorite) in the regular days too.  I never fail to do this snack during diwali  :)

Ingredients


Besan - 1 cup
Rice flour - 2 cups
Hing powder - less than 1/4 tsp
Ghee - 1 tbsp, if you wish you can add more
Red chilli powder - 1 1/2 to 2 tsps (According to your spice level)
Salt - 3/4 tbsp or as needed
Water - as needed (I used 1 3/4 cups)
Oil - for deep frying

Method


  • Heat oil in a pan for deep fry.
  • Sieve both the flours in a large vessel. Mix all the above ingredients except oil into fine dough.

NOTE :  Dough must be non-sticky and solid. If the dough is not in correct consistency, either it is hard to press or it won't get ribbons continuously.


  • Take enough dough into the murukku maker and keep it aside. Use two lined plate in the murukku maker.


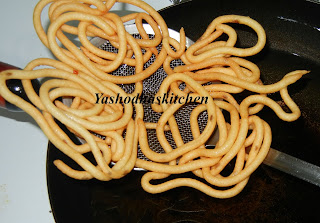
  • Once the oil gets ready, press dough continuously with a single layered ribbon into the oil using murukku maker. Don't press dough layer by layer, it will get more time to cook and sometimes it fails to get full cook. But the color might be go darker.


  • Cook until the bubbles in the oil gets subside. You can adjust the flame according to the need.

  • Remove it from the oil to the paper towel.


  • After it cools completely, break them into pieces and finally place it into the air tight container.



Tuesday, October 29, 2013

THENKUZHAL / PLAIN MURUKKU - DIWALI SNACK

Preparation time -  10 minutes


Cooking time - 1 hour


Serving size - 50 to 60 pieces


Thenkuzhal is a very easy and tasty recipe. Even babies could eat this murukku once they get their new teeth.  It is the most important snacks on festive days especially during Diwali. We all know, during festive time we use to share sweets and snacks to friends and relatives. By that time, we could see thenkuzhal is the common snack from every ones home :)  I often make this thenkuzhal in my home and keep it in the air tight large container. The reason is, it is my kid's favorite snack.

There is one more interesting thing in the thenkuzhal - "Araivekkadu" which means half cooked murukku. It is very soft and tastes yummy. I am remembering my childhood days... My brother loves this type of thenkuzhal very much. My hubby too :) You could eat this type of murukku within 1 or 2 hours, after that it won't tastes good.

Diwali is nearing ... only 2 more days... I started making snacks, but I couldn't find time to upload recipes in my blog. I know that I am not active in blogging :( Will try to upload recipes from now. 

Ingredients


urad flour - 1 cup
Rice flour - 4 cups
Hing powder -  1/3 tsp
Ghee - 1/4 cup, if you wish you can add more
Cumin seeds - 1 tbsp
Salt -  as needed
Water - as needed
Oil - for deep frying

Method


  • Heat oil in a pan for deep fry.


  • Sieve both the flours in a large vessel. Mix all the above ingredients except oil into fine dough.


NOTE :  Dough should not be either too hard or too watery. It should be as like as in the below picture. Then only, it is easy to press.IF IT IS HARD, it is too hard to press. IF IT IS WATERY, it will be either separate or break into pieces. Dough must be soft and non-sticky.


  • Put 2 big spoons full into the murukku maker and keep it aside. Use 3 plain wholes plate in the murukku maker for thenkuzhal.


  • Once the oil gets ready, press dough into the oil using murukku maker. Make 3 or 4 murukkus at a time. Then only it will get cook with enough spaces.


  • Cook both the sides well in a medium flame. If you need adjust flame from medium to low and vice verse, unless murukku will get burn or with color differences.


  • Remove it from the oil to the paper towel.


  • Once it gets cool, shift them into the air tight container.


Tuesday, October 22, 2013

CARROT CABBAGE THUVAYAL/CHUTNEY WITH NO COCONUT

Serving size - 2 or 3


Preparation time - 10 minutes


Cooking time - 10 minutes


I am an ardent lover of chutney as always. I thought of avoiding coconut today. So I have tried this thuvayal for rice. You can also keep this as the best side for idly and dosa too. It was really tasted good and we enjoyed it, especially my little picky eater :)  Here I used healthy veggies carrot and cabbage. Instead of coconut, I used onion and tomato in this thuvayal.


Ingredients


Onion - 1/2 cup (chopped square)
Tomato - 1/4 (chopped square)
Cabbage - 1/3 or more cup
Large Carrot - 1/2 (sliced)
Urad dal - 2 tsp
Red chillies - 4 or 5
Oil - 2 to 3 tsp for frying
Salt - as needed

Seasoning ( optional)


Mustard seeds - 1/4 tsp
Curry leaves - 3 or 4
Oil - 1 tsp

Method

  • Heat 2 to 3 tsp of oil in a pan, add urad dal , salute it for half a minute.
  • Add red chillies before the urad dal starts getting golden color and fry for few seconds, add onions, cabbage and carrot. Salute it for 1 or 2 minutes. (Note : don't burn urad dal or red chillies, it will spoil the taste)
  • Finally add tomatoes and salute it for 1 or 2 minutes.
  • Allow it to get cool and grind all together with salt.
  • Replace ground thuvayal into a bowl and serve it with rice or idly or dosa.
  • Seasoning is optional. If you would like to add seasoning, heat oil, once it gets heated, add curry leaves and mustard seeds. Add the seasoning to the thuvayal once mustard seeds are splutter.


FACEBOOK POPUP CODE
Don't Forget To Join US Our Community
×
bloggerWidget